
In this course you will learn one of the main principle of software design, the dependency injection
-
Fundamental principle of software design
-
Introduced by Martin Fowler (famous english computer engineer)
-
Helps to split responsibilities in your code ⇒ weakly coupled components
-
Facilitates testing
Spring ecosystem was built on this concept and understand dependency injection is a first step to understand Spring.

Objects and application
When writing an application, as developers, we break down the problem we’re trying to solve into smaller ones, and do our best to comply with the architecture and design principles we’ve chosen for our application: flexible, decoupled, testable, easy to understand, etc.
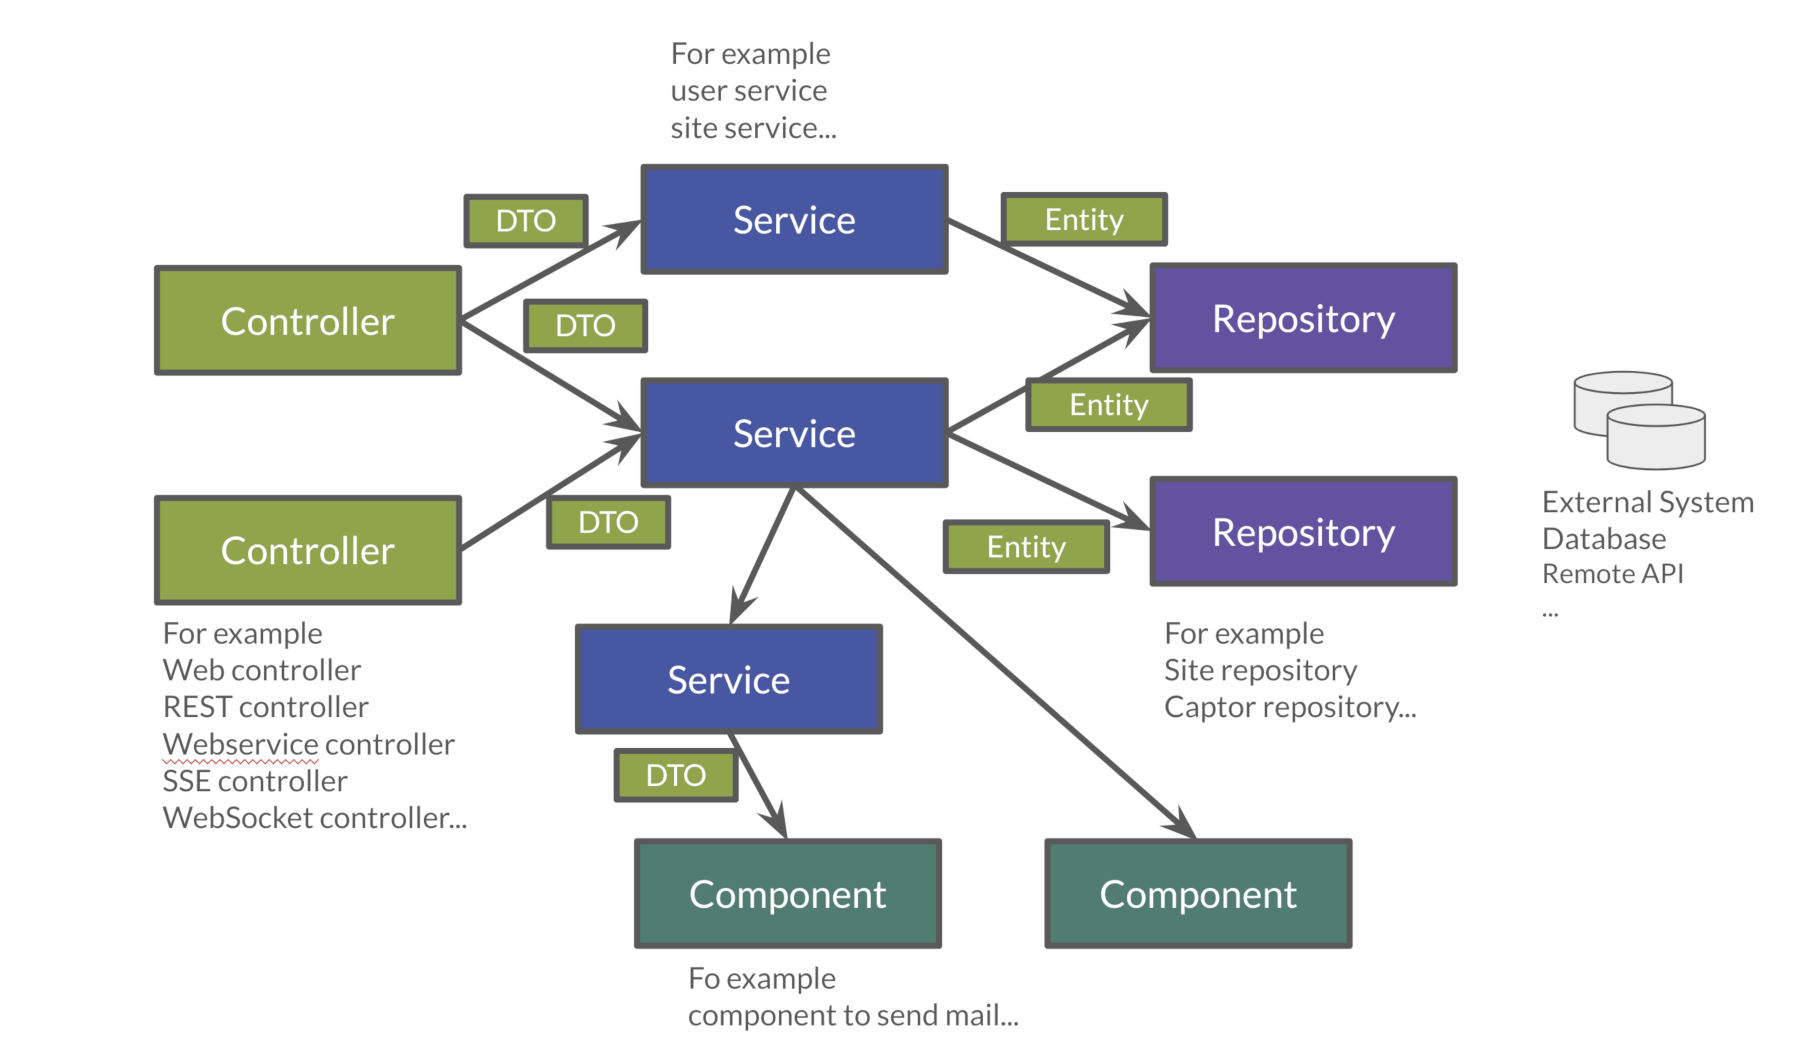
For that we use a lot of objects
-
Service contains implementations of your business rules
-
Components help to resolve a technical problem
-
Repository interacts with external systems as database, webapi…
-
Controllers are in front of your app to read and check data sent by users
-
And you have objects to transport data DTO, entities
When we want to define an object we write for example
public class NameService {
public String getName() {
return "Guillaume";
}
}And to use this object elsewhere we have to create a new instance with a new instruction
public class WelcomeService {
public void sayHello() {
NameService nameService = new NameService();
System.out.println("Hello " + nameService.getName());
}
}We have a strong coupling between these classes WelcomeService and NameService. If we want to change NameService we have a good chance of having to update WelcomeService.
For example, if NameService need to use others objects, you have to update the WelcomeService class constructor
public class NameService {
private UserService userService;
public NameService(UserService userService) {
this.userService = userService;
}
public String getName() {
return "Guillaume";
}
// ...
}As the constructor changed you must update the coupled class
public class WelcomeService {
public void sayHello() {
UserService userService = new UserService();
NameService nameService = new NameService(userService);
System.out.println("Hello " + nameService.getName());
}
}We have to resolve these problems (break coupling and use singleton) and the solution is Inversion of Control (IOC).
To introduce this principle we will use a simpler example
If a class A uses a class B

public class B {
public String name() {
return "Guillaume";
}
}
public class A {
public void hello() {
B b = new B();
System.out.println("Hello " + b.name());
}
}Other consideration: in a web application, you should not implement a service at every call. It’s not efficient if a class has a lot of collaborators, and if a service is called in different points in your application.
In this case the class which not change must be created only once. We often use the Singleton design pattern to do that.
Inversion of Control (IOC) Principle
To resolve this problem, we can use a client, a factory to instantiate class B and inject it into class A.
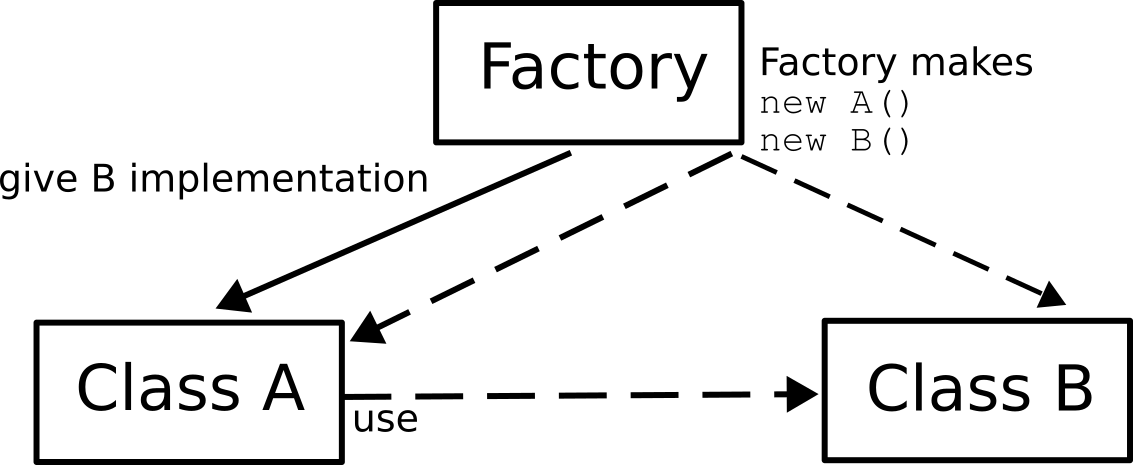
If an object needs other objects, it does not instantiate itself but they are provided by a factory or a client (a container).
Objects define their collaborators (that is, the other objects they work with) through constructor arguments or properties. Container is responsible for the construction of the objects.
It will provide (inject) the collaborators requested by an object.
The first version of Spring was created to resolve this problem. Spring provides a container to create and inject objects.
You must remember
If an object needs other objects, it does not instantiate itself, but they are provided by a factory (in our case Spring).
Therefore, we no longer have to find the new key word in your code.
The only exception is for objects which contain data : Entity and DTO.
Inversion of Control (IoC) principle is also known as dependency injection (DI).
Spring Beans
In Spring, the objects that form the backbone of your application and that are managed by the Spring IoC container are called beans.
A bean is an object that is instantiated, assembled, and managed by a Spring IoC container
The Java language was named Java in reference to Java coffee, the coffee of Indonesia. The Java logo is a cup of tea. With Spring an app can be seen as a set of Java beans

Create a bean
By annotation
In Spring, we can use a stereotype on our classes to defined them as Bean: @Service, @Component, @Repository, @Controller
@Service
public class MyGreetingService {
// Code ...
}
@Controller
public class MyGreetingController {
// Code ...
}Spring Boot is able to scan classpath to auto-detect and auto-configure beans annotated with @Service, @Component, @Repository, or @Controller.
Each annotation is equivalent, but a sterotype (@Service, @Repository…) helps to understand the object role in your app

By configuration
Also, we can create a Spring bean in a configuration bean, when we need to configure it.
The first step is to create a Configuration bean annotated with @Configuration.
This annotation indicates that the class can be used by the Spring IoC container as a source of bean definitions
@Configuration
public class MyAppConfiguration {
// ...
}Beans are components instances. A method annotated with @Bean will return an object that should be registered as a bean in the Spring application context.
@Bean is used to explicitly declare a single bean, rather than letting Spring do it automatically as @Component, @Service…
In this example we said to Spring that our UserStore object needs a DataStoreConnectionPool
@Configuration
public class MyAppConfiguration {
@Bean
public UserStore userStore(DataStoreConnectionPool connectionPool) {
return new UserStore(connectionPool.fetchConnection());
}
}This way of declaring a bean is used to configure Spring or another library. With these declarations, we can override the default beans configured by Spring.
Add dependencies
When a class need another object, we use @Autowired to inject them via Spring. You have 2 ways to inject a bean in another
Injection by setter
@Component
public class AImpl implements A {
@Autowired
private B b;
public void setB(B b) {
this.b = b;
}
public B getB() {
return b;
}
}Injection by constructor
@Component
public class AImpl implements A {
private B b;
@Autowired
public AImpl(B b) {
this.b = b;
}
public B getB() {
return b;
}
}If you have only one constructor @Autowired is not mandatory for Spring. However, if several constructors are available and there is no primary/default constructor, at least one of the constructors must be annotated with @Autowired in order to instruct the container which one to use.
You have 2 ways of injecting dependencies into an object but injection by constructor is the one recommended by the community
In this example UserStore and CertificateManager are injected into AuthenticationService
@Service
public class AuthenticationService {
private final UserStore userStore;
private final CertificateManager certManager;
public AuthenticationService(UserStore userStore, CertificateManager certManager) {
this.userStore = userStore;
this.certManager = certManager;
}
public AcccountStatus getAccountStatus(UserAccount account) {
// here we can use the UserStore with this.userStore
}
}How it works ?
Spring looks for components by scanning your application classpath : looking for annotated classes in the app packages or the beans you’ve declared in your configuration beans.
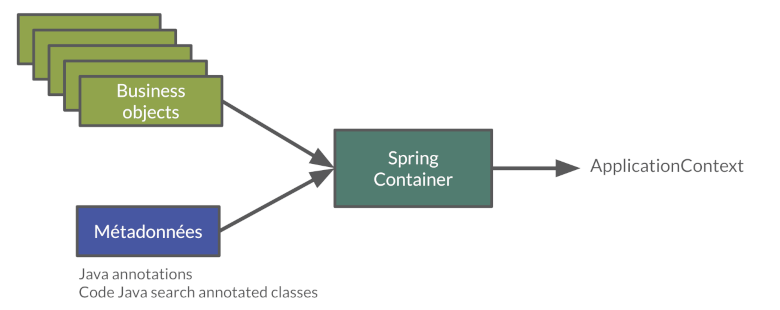
All those components are registered in an application context.
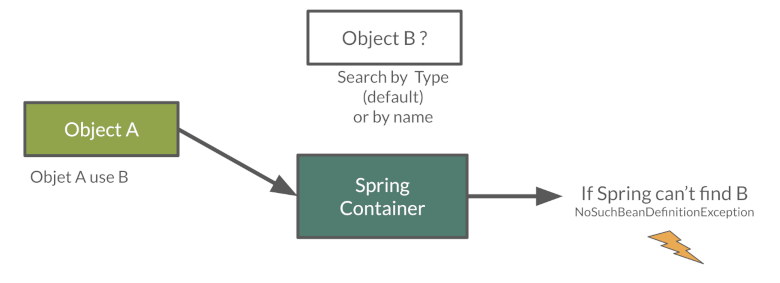
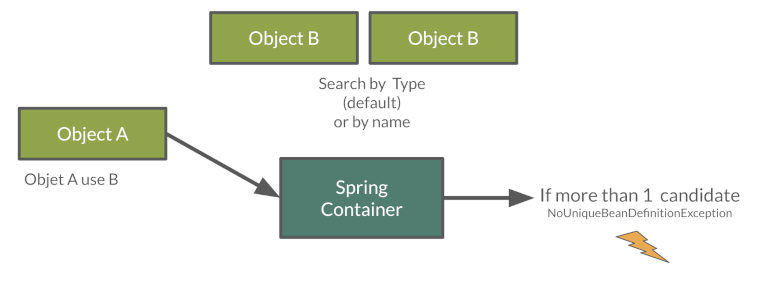
Spring searches a Bean by its type or else by its name
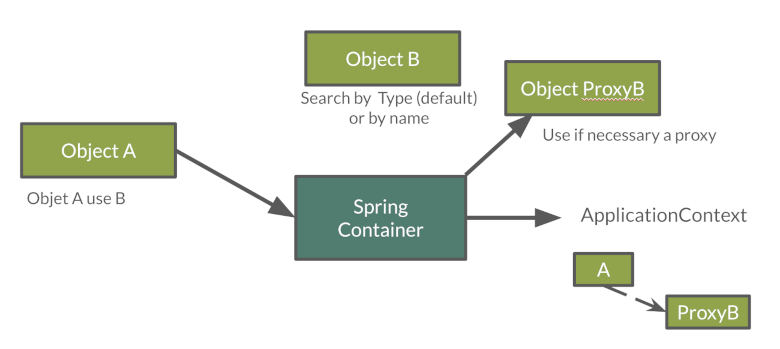
Spring throws a NoSuchBeanDefinitionException if a bean can’t be found
Spring throws a NoUniqueBeanDefinitionException if several beans are found and if it doesn’t know which bean use
 Using Dependency Injection
Create a first bean
First, let’s create an interface for our application called GreetingService in package com.emse.spring.automacorp.hello
package com.emse.spring.automacorp.hello;
public interface GreetingService {
void greet(String name);
}Don’t forget to commit periodically your work on Git. If you need more information about Git you can read this course.
Your first job is to output "Hello, Spring! in the console when the application starts.
For that, do the following:
-
Create in package
com.emse.spring.automacorp.helloa class calledConsoleGreetingService. This class has to implementGreetingServiceinterface -
Mark it as a service with
@Serviceannotation. -
Implement greet method. This method should write to the console using
System.out.println.
To check your work you have to create this test in folder src/test
package com.emse.spring.automacorp.hello;
import org.assertj.core.api.Assertions;
import org.junit.jupiter.api.Test;
import org.junit.jupiter.api.extension.ExtendWith;
import org.springframework.boot.test.system.CapturedOutput;
import org.springframework.boot.test.system.OutputCaptureExtension;
@ExtendWith(OutputCaptureExtension.class) // (1)
class GreetingServiceTest {
@Test
public void testGreeting(CapturedOutput output) {
GreetingService greetingService = new ConsoleGreetingService(); // (2)
greetingService.greet("Spring");
Assertions.assertThat(output.getAll()).contains("Hello, Spring!");
}
}-
(1) We load a Junit5 extension to capture output (log generated by your app)
-
(2) We’re testing our service implementation without Spring being involved. We create a new instance of this service with a new
You can verify that your implementation is working properly by running ./gradlew test command or by buttons in your IDEA.See this video to see the different solutions
The test source code is valid. If the test execution fails, you have to fix your code.
Inject your bean
Your second Job is to create a new interface UserService in package com.emse.spring.automacorp.hello
package com.emse.spring.automacorp.hello;
import java.util.List;
public interface UserService {
void greetAll(List<String> name);
}You can now
-
create an implementation of this interface called
DummyUserService -
Mark it as a service.
-
Inject service
GreetingService(use interface and not implementation) -
Write
greetAllmethod. You have to callgreetmethod of theGreetingServicefor each name
As for the first service, we’re going to check this new service with a unit test
package com.emse.spring.automacorp.hello;
import org.assertj.core.api.Assertions;
import org.junit.jupiter.api.Test;
import org.junit.jupiter.api.extension.ExtendWith;
import org.springframework.beans.factory.annotation.Autowired;
import org.springframework.boot.test.system.CapturedOutput;
import org.springframework.boot.test.system.OutputCaptureExtension;
import org.springframework.context.annotation.ComponentScan;
import org.springframework.context.annotation.Configuration;
import org.springframework.test.context.junit.jupiter.SpringExtension;
@ExtendWith(OutputCaptureExtension.class)
@ExtendWith(SpringExtension.class) // (1)
class DummyUserServiceTest {
@Configuration // (2)
@ComponentScan("com.emse.spring.automacorp.hello")
public static class DummyUserServiceTestConfig{}
@Autowired // (3)
public DummyUserService dummyUserService;
@Test
public void testGreetingAll(CapturedOutput output) {
dummyUserService.greetAll(List.of("Elodie", "Charles"));
Assertions.assertThat(output).contains("Hello, Elodie!", "Hello, Charles!");
}
}-
(1) We use
SpringExtensionto link our test to Spring. With this annotation a Spring Context will be loaded when this test will run -
(2) We have to configure how the context is loaded. In our case we added
@ComponentScan("com.emse.spring.automacorp.hello")to help Spring to found our classes. In our app this scan is made by SpringBoot, but in our test SpringBoot is not loaded -
(3) As our test has is own Spring Context we can inject inside the bean to test
You can verify that your implementation is working properly by running ./gradlew test command.
Inject your bean in configuration bean
Now, a new class AutomacorpApplicationConfig in com.emse.spring.automacorp package next AutomacorpApplication class. We want to create a new bean of type CommandLineRunner.
CommandLineRunner instances are found by Spring Boot in the Spring context and are executed during the application startup phase.
// (1)
public class AutomacorpApplicationConfig {
// (2)
public CommandLineRunner greetingCommandLine() { // (3)
return args -> {
// (4)
};
}
}-
(1) First, annotate this class to mark it as a configuration bean
-
(2) Add annotation to say that this method return a new Bean Spring
-
(3) Then, tell Spring that here we need here a GreetingService component, by declaring it as a method argument
-
(4) Finally, call here some service method to output the "Hello, Spring!" message at startup; since we’re getting GreetingService, no need to instantiate one manually
Starting your application, you should see something like:
2023-08-23T19:59:02.183+02:00 INFO 152677 --- [ restartedMain] o.s.b.d.a.OptionalLiveReloadServer : LiveReload server is running on port 35729
2023-08-23T19:59:02.210+02:00 INFO 152677 --- [ restartedMain] o.s.b.w.embedded.tomcat.TomcatWebServer : Tomcat started on port(s): 8085 (http) with context path ''
2023-08-23T19:59:02.219+02:00 INFO 152677 --- [ restartedMain] c.e.spring.automacorp.AutomacorpApplication : Started AutomacorpApplication in 1.825 seconds (process running for 2.506)
Hello, Spring!Other cases
Now, we’re going to test a few cases to understand how a Spring Application reacts to some situations. For each case, try the suggested modifications, restart your application and see what happens.
Of course, after each case, revert those changes, to get "back to normal". (You can use Git for that)
-
What happens if you comment the @Component / @Service annotation on your ConsoleGreetingService?
-
Now, try adding
AnotherConsoleGreetingService(which says "Bonjour" instead of "Hello"), marked as a component as well. Try again this time after adding a @Primary annotation onConsoleGreetingService. -
Finally, try the following - what happens and why?
@Service
public class ConsoleGreetingService implements GreetingService {
private final CycleService cycleService;
@Autowired
public ConsoleGreetingService(CycleService cycleService) {
this.cycleService = cycleService;
}
@Override
public void greet(String name) {
System.out.println("Hello, " + name + "!");
}
}@Service
public class CycleService {
private final ConsoleGreetingService consoleGreetingService;
@Autowired
public CycleService(ConsoleGreetingService consoleGreetingService) {
this.consoleGreetingService = consoleGreetingService;
}
}@Primary is not the only way to resolve multiple candidates, you can also use @Qualifier; check its javadoc to see how you could use it.
Conclusion
Does Spring Framework be only Dependency Injection container? The answer is No.
It builds on the core concept of Dependeny Injection but comes with a number of other features (Web, Persistence, etc.) which bring simple abstractions.
Aim of these abstractions is to reduce Boilerplate Code and Duplication Code, promoting Loose Coupling of your application architecture.