09/09/2024
Developement
Source
management
Table of Contents
This course presents Git & Github. Git is used to centralize and log the changes on your code. This is a software. GitHub is a cloud platform built on Git and you can use their services to store, manage, share your code with your co-workers…
For more information about Git you can find
-
a summary of the main instructions https://education.github.com/git-cheat-sheet-education.pdf
-
official documentation https://git-scm.com/docs
For who, why ?
A version control system (VCS: version control system) helps to manage the history of the changes made by people, teams, or only one person who collaborate on a project.
When the project evolves, people can at any time, find an old version of the code.
Git answers these questions quickly
-
What changes have been made?
-
Who made the changes?
-
When were the changes made?
-
Why were the changes made?
Git is a decentralized source management software (DVCS) created in 2005 by Linus Torvald (creator of the Linux kernel). The sources are stored both on the computer of each contributor of the project, but also on a centralized server.

Figure 1. logo Git
Today, most of the open source or commercial projects developed use Git (More than 90% of developers, according stackoverflow insights).
Git allows access to all files, branches, versions (releases) or tags of a project to authorized people.
Basically you don’t need a centralized solution with Git, but online solutions have emerged like Github or Gitlab.

Figure 2. logo Github

Figure 3. logo Gitlab
These services extend Git and offer more features like pull requests, code reviews… Github was the precursor but today Gitlab is equivalent, and you can use the one you prefer.
As I had to make a choice for our courses, I choose Github. From now on, I will only talk about Github. Back up your sources regularly. At the end of our courses, you will have to provide me the URGithub URL of your repository which will contain the sources of your project.
What did we do before ?
Before Git, it was difficult to follow the history, especially when we had multiple project copies.
Early solutions, like CSV or SVN (Subversion) were quickly limited.
It was often awful to refactor your code because of their limitations.
What’s a repository ?
A Git repository contains all the files and directories associated with your project. It also contains all the history of changes made on each one. You can retrieve any changes made by any developer at any time.
Publishing changes is called a commit. Each commit is linked to another (this is a chained list).
Commits can be organized into several parallel branches.
Projects are stand-alone units, and anyone with a copy of the repository can access the entire code and its history. You can execute different operations like logging, cloning, branch creation, commit, merging…
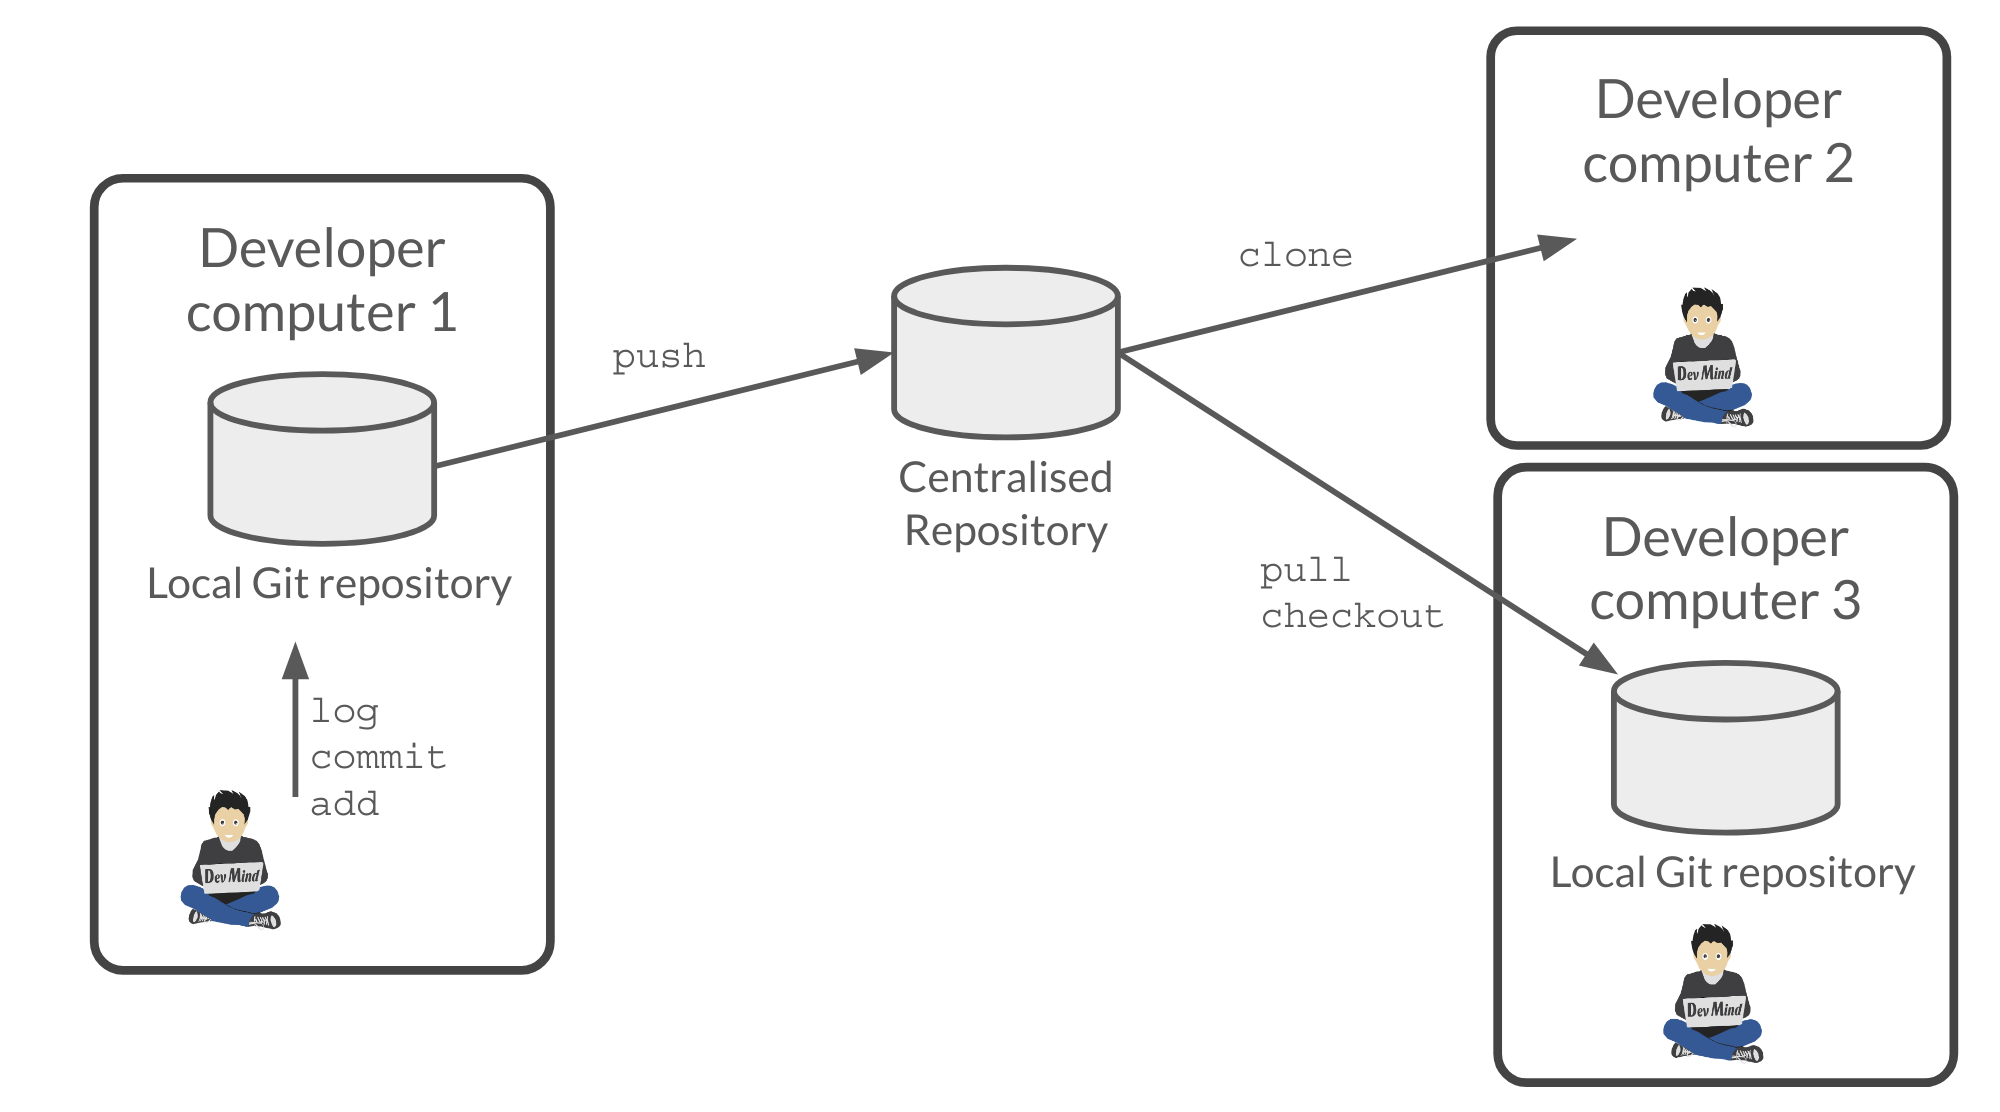
Figure 4. Centralized repository, local repository
Install Git
If you use Windows, you can download Git here https://git-scm.com/downloads
On a Linux (Fedora)
sudo yum install gitOn Linux (Debian, Ubuntu) use
sudo apt-get install gitTo check your install, display the git version in terminal
~$ git --version
git version 2.34.1First commands
Configure Git
It’s important to provide some information to Git, especially when you push your changes to a centralized repository. Use the git config operation to set your name and your email.
~$ git config --global user.name "Guillaume EHRET Dev-Mind"
~$ git config --global user.email "guillaume@dev-mind.fr"By default, Git will create a branch called master when you create a new repository with the command git init. The terms master and slave are often used in computer industry’s. After many protests, these harmful and antiquated terms were no longer considered appropriate. Github used the term main branch. To use the same configuration, you can execute
~$ git config --global init.defaultBranch mainClone a Git project
Go in your working directory, and in a terminal type
~$ git clone https://github.com/Dev-Mind/git-demo.gitThe remote project git-demo is downloaded on your computer. You get all the history, all the files, all the branches …
For example you can run these commands
~$ cd git-demo
~$ git logInitialize a Git repository
For a new project, it’s better to start from 0. Delete the directory to recreate it
~$ cd ..
~$ rm -rf git-demo
~$ mkdir git-demo
~$ cd git-demoTo link this directory to Git, launch
~$ git init
Initialized empty Git repository in /home/devmind/Workspace/java/git-demo/.git/A .git directory has been added and it contains the different files, logs, traces
---
~$ ls -la
total 28
drwxr-xr-x 3 devmind devmind 4096 sept. 26 22:46 .
drwxr-xr-x 10 devmind devmind 4096 sept. 26 22:46 ..
drwxr-xr-x 8 devmind devmind 4096 sept. 26 22:46 .git
----|
Note
|
Git will display a warning if you name the default branch master (default configuration). Read the chapter about Git configuration to set another default branch name. |
Linking files to Git
Let’s start by creating files in this git-demo directory
~$ echo "Hello world" > hello.txt
~$ echo "<html><body><h1>Hello World</h1></body></html>" > hello.html
~$ echo "Hello world" > hello.md
~$ ls
hello.html hello.txt hello.mdUse git status to know the state
~$ git status
On branch main
No commits yet
Untracked files:
(use "git add <file>..." to include in what will be committed)
hello.html
hello.md
hello.txt
nothing added to commit but untracked files present (use "git add" to track)Use the git add command to indicate that a new or multiple files will be handled by git.
~$ git add hello.txt
~$ git add .-
Adds hello.txt file
-
Adds all the files
At this moment, our files are not saved in Git. They are in a staging area. We have only a snapshot of the changes
~$ git status
On branch main
No commits yet
Changes to be committed:
(use "git rm --cached <file>..." to unstage)
new file: hello.html
new file: hello.md
new file: hello.txtSaving modifications
The following command saves the snapshot in the project history and completes the change tracking process. In short, a commit works like taking a photo. We freeze in time what we have done.
~$ git commit -m "First commit"
[main a7d5b84] First commit
3 files changed, 3 insertions(+)
create mode 100644 hello.html
create mode 100644 hello.md
create mode 100644 hello.txt-
-mto add a message. It’s very important to be able to understand why a commit was made -
Git displays the name of the branch ⇒
mainand the hash of the commit` a7d5b84` (this is the number of the photo)
Our Git history is a living, ever-changing, searchable record that tells the story of how and why our code is the way it is. It’s important to explain the purpose of a commit.And try to commit often your work. It is a security if you want to restore your work. For example
Know the current state
We will delete the hello.txt file, update hello.md and add a hello.adoc file
~$ rm hello.md
~$ echo "My first Git example" > hello.md
~$ echo "Hello World" > hello.adocLaunch the following command to know where Git is
~$ git statusGit should indicate that you have a modified file hello.md and an untracked file hello.adoc
~$ git add .
~$ git commit -m "Second commit"
[main 7b7d8e6] Second commit
3 files changed, 2 insertions(+), 2 deletions(-)
create mode 100644 hello.adoc
delete mode 100644 hello.txt~$ git status
On branch main
nothing to commit, working tree cleanNow all the changes are saved
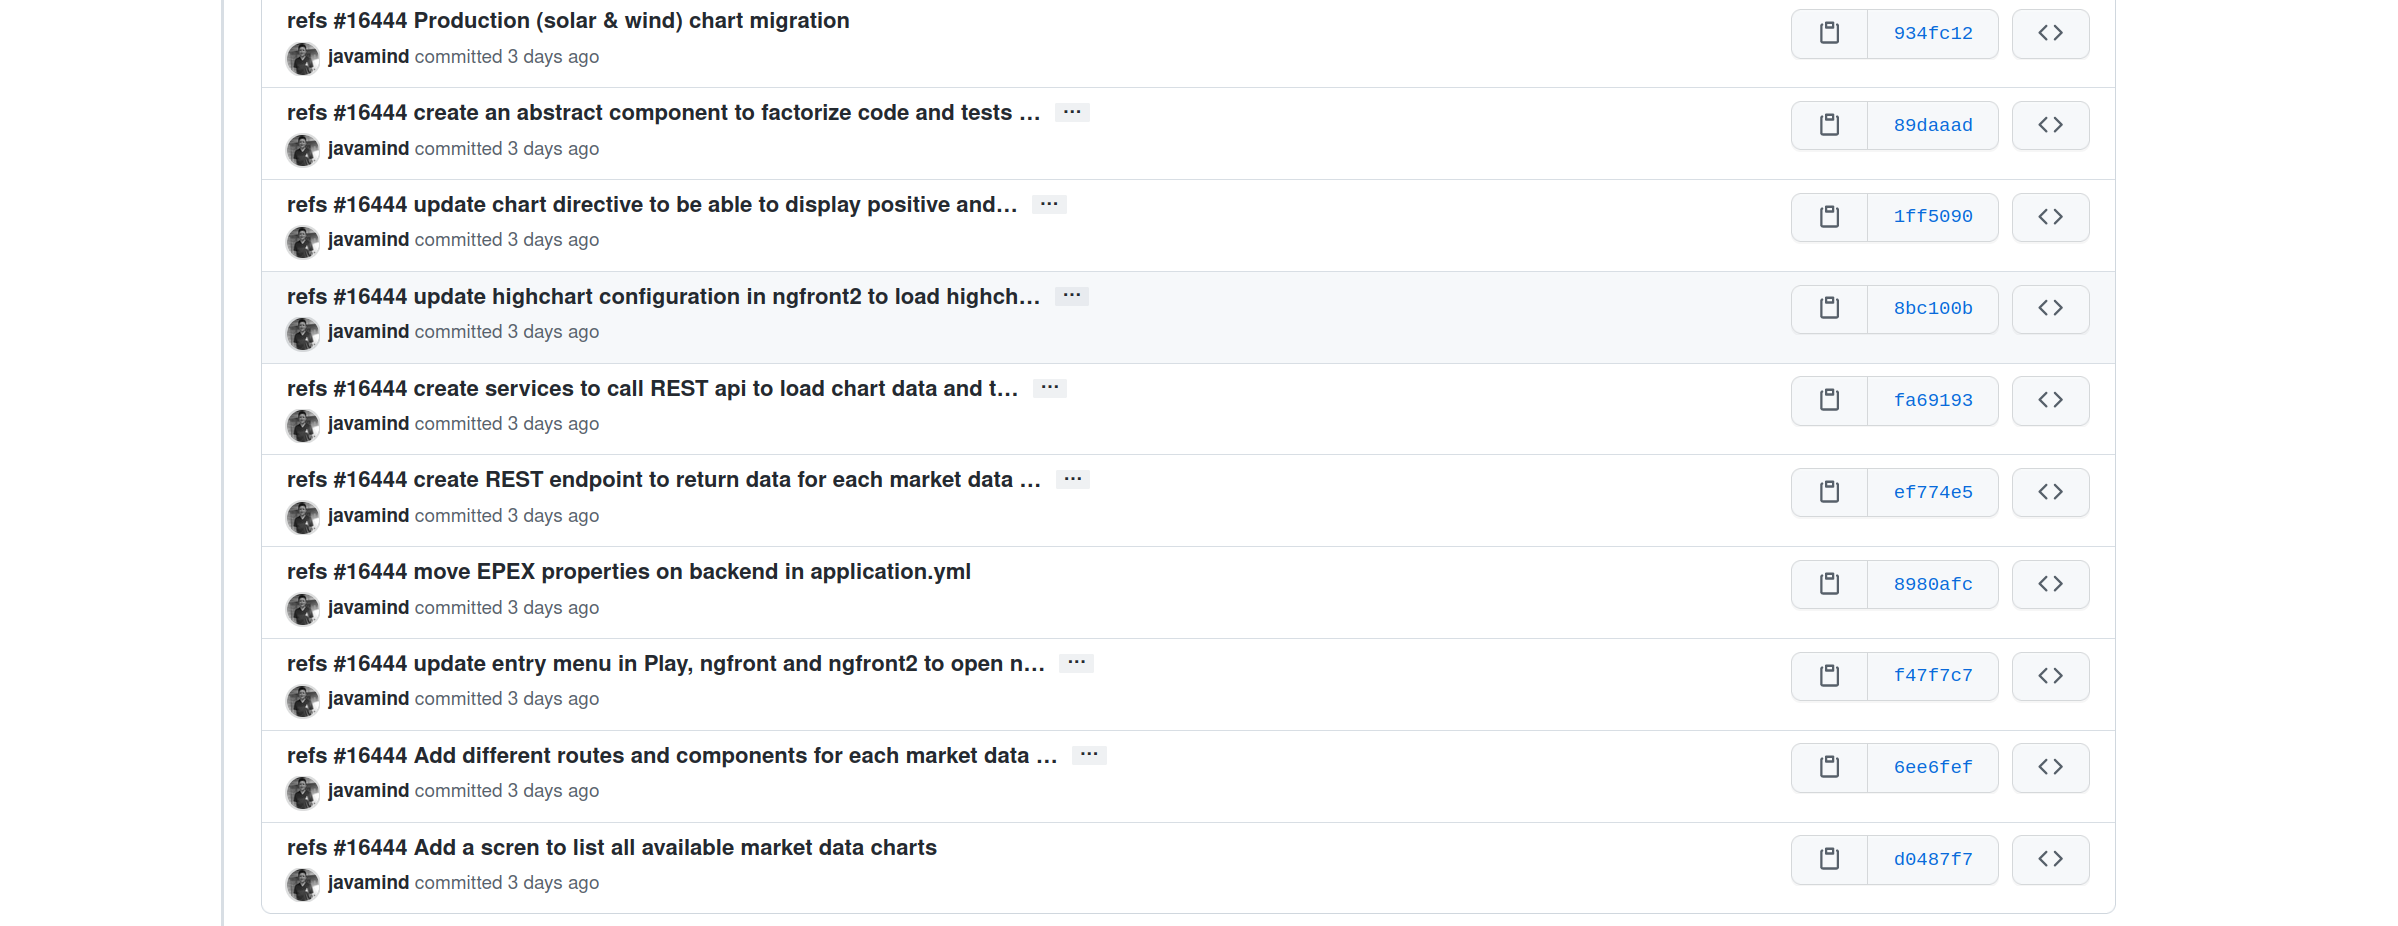
See history
Use the log command
~$ git log
commit 7b7d8e69a06af284c9da7aa4a8c28835d23318fe (HEAD -> main)
Author: Guillaume EHRET Dev-Mind <guillaume@dev-mind.fr>
Date: Wed Sep 26 23:22:46 2018 +0200
Second commit
commit a7d5b843ebc65ac6e94c37872d6a936e1c03a6b5
Author: Guillaume EHRET Dev-Mind <guillaume@dev-mind.fr>
Date: Wed Sep 26 23:08:00 2018 +0200
First commitWe find our two commits, with the names we have set, at what time …
See current changes
We will update a file and run the diff command
~$ echo "Fichier Asciidoc" > hello.adoc
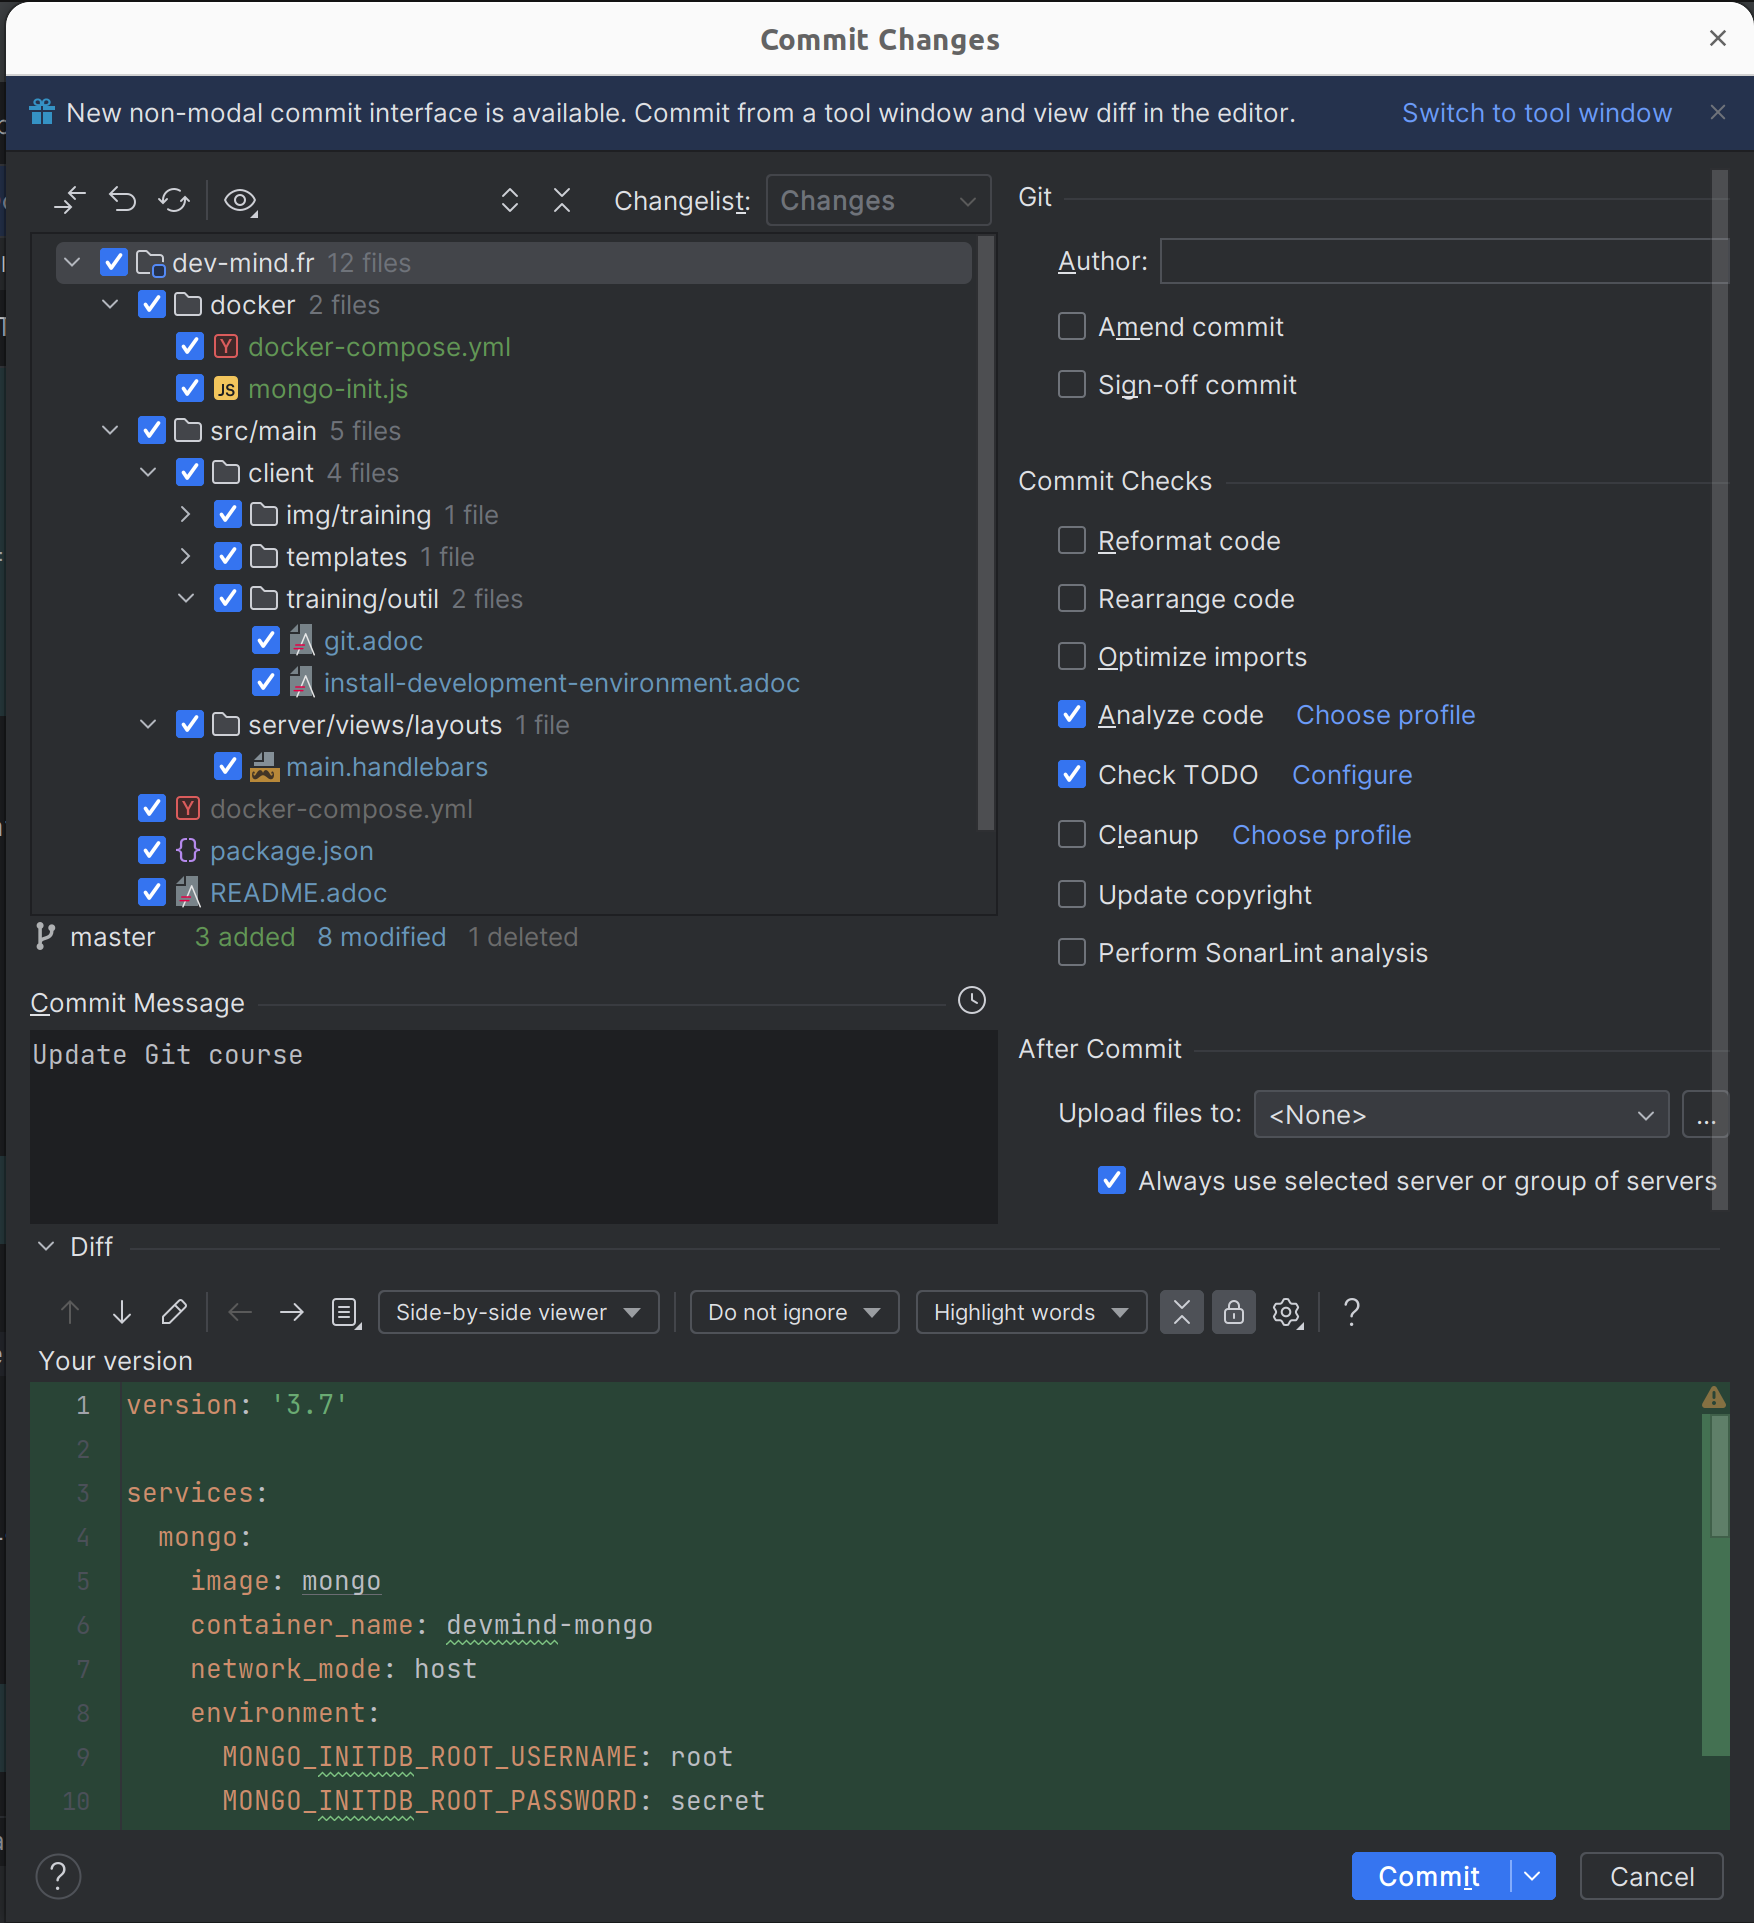
~$ git diffYou should see, what has been added and removed in the file.
You can use IDE (like IntelliJ) and its visual tools for tracking changes. For example
Go back in the history
You can use a reset to go back to the state of the last commit
For example
~$ echo "Hello World" > hello.adoc
~$ git status
On branch main
Changes not staged for commit:
(use "git add <file>..." to update what will be committed)
(use "git restore <file>..." to discard changes in working directory)
modified: hello.adoc
no changes added to commit (use "git add" and/or "git commit -a")
~$ git reset --hard
~$ git status
On branch main
nothing to commit, working tree cleanWorking with branches
Generally on a project we have a main branch (generally called main). We can open different branches in parallel to fix bugs, add new features.
These branches are merged on the main branch when they are completes. For example when the code will be reviewed by co-coworkers and the app tested by users.
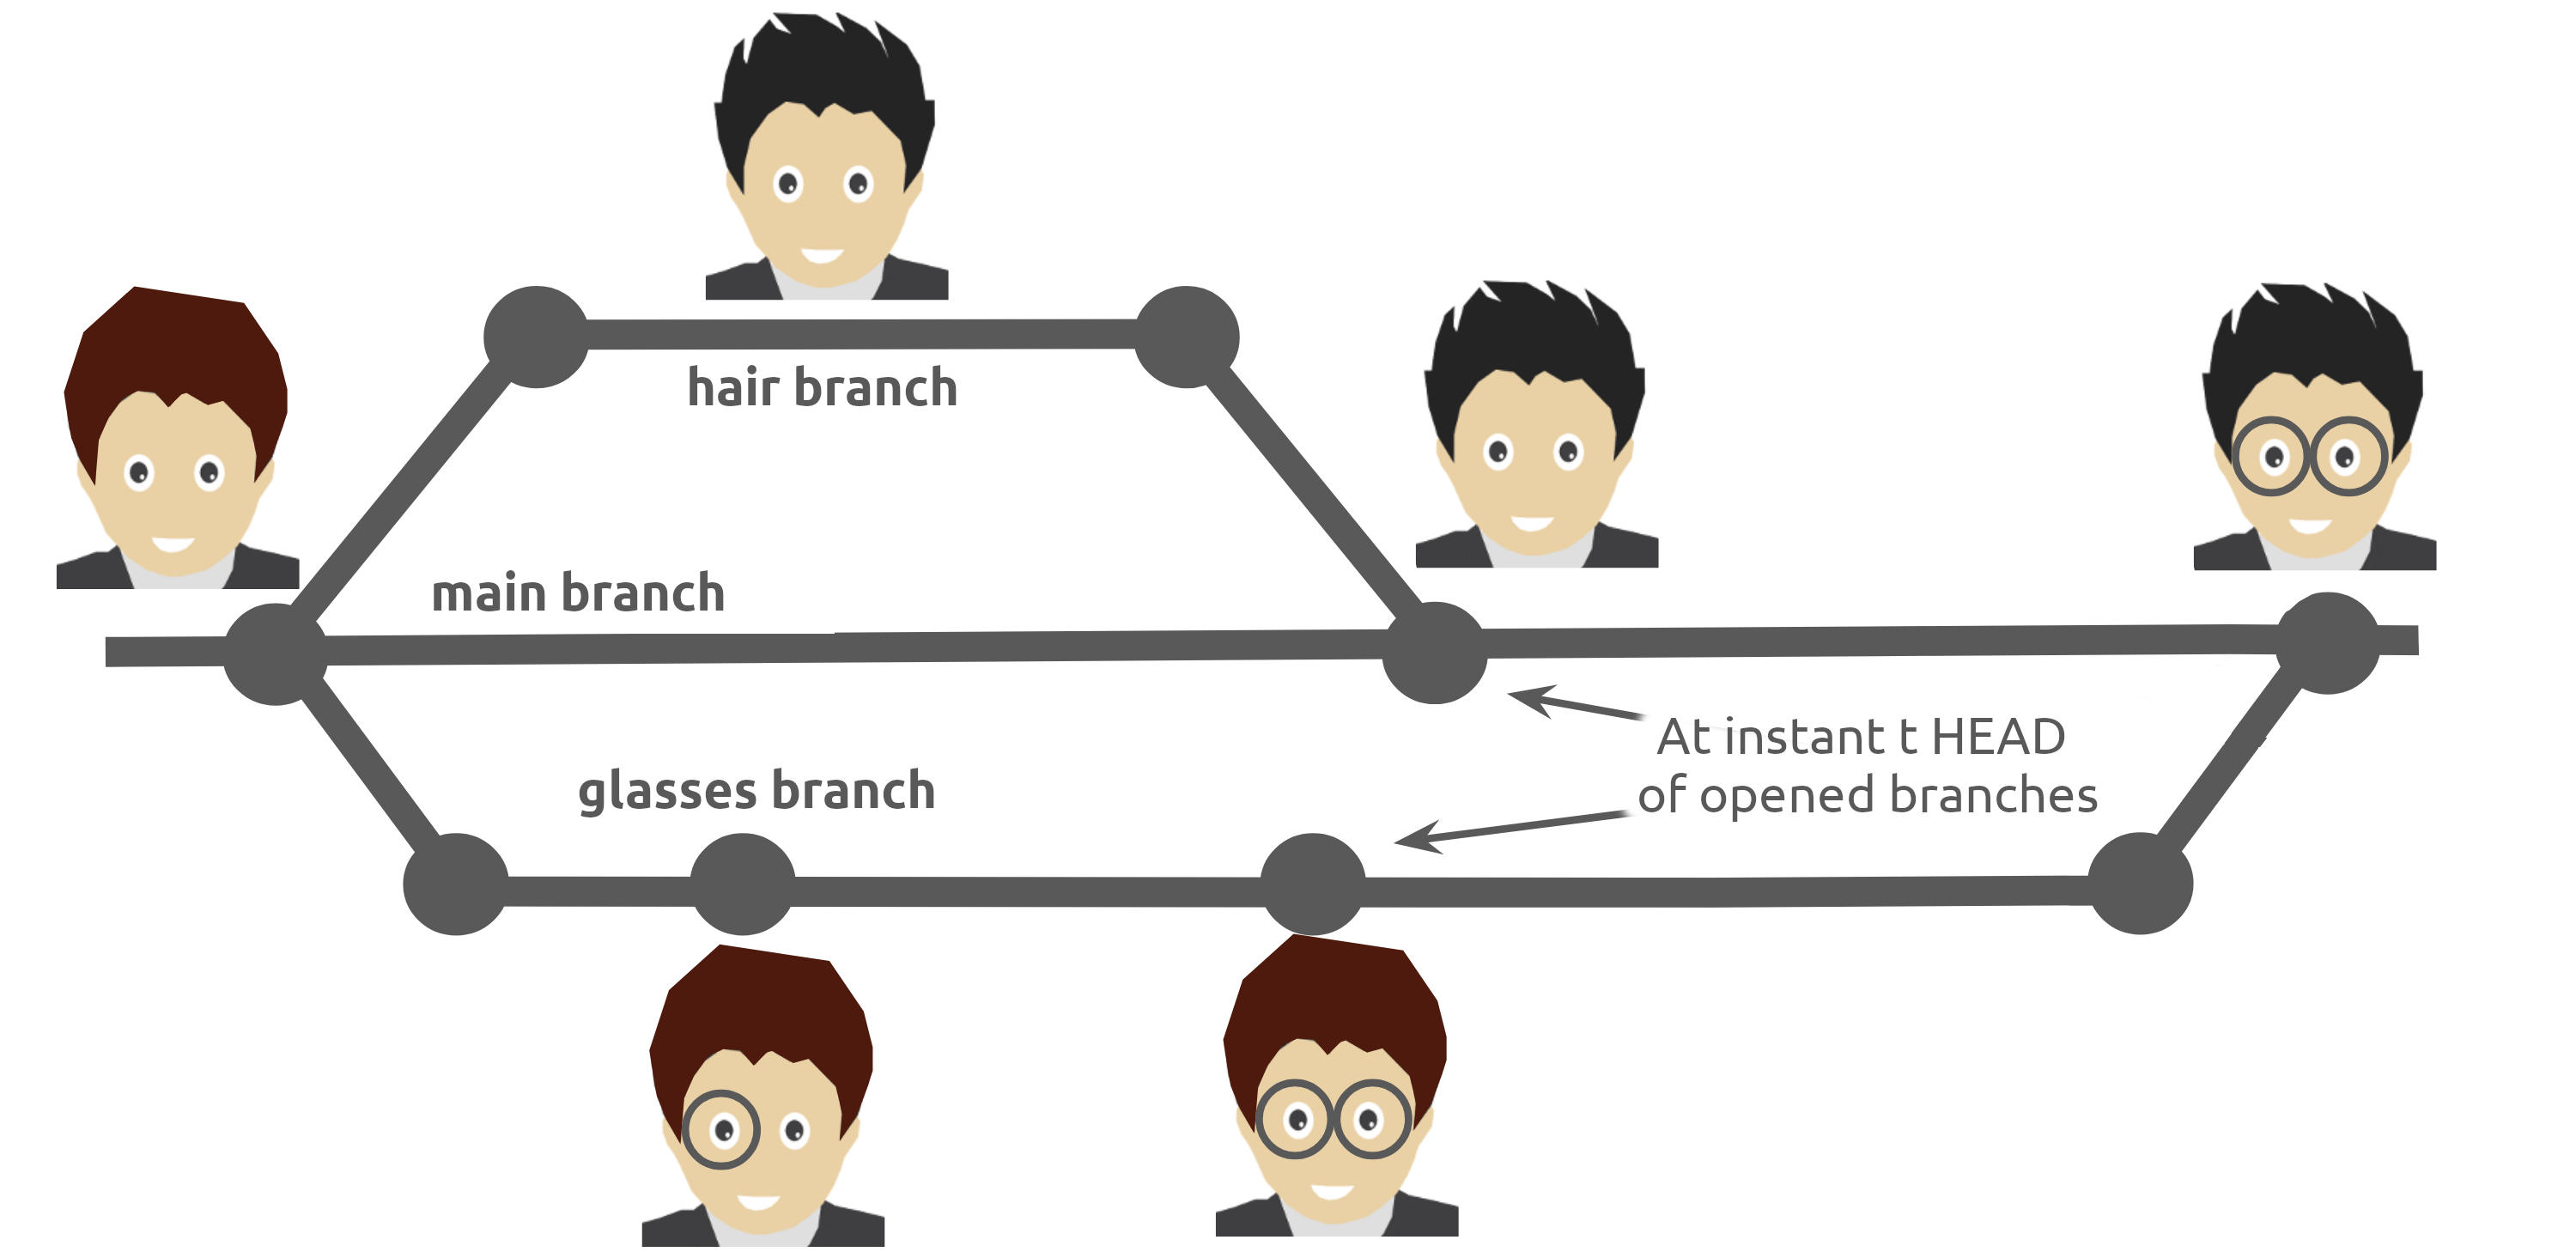
Figure 5. Branch Principle
See the current branch
Run the following command to see the current branch
~$ git branch
feat/hairs
* mainFor the moment we have 2 local branches feat/hairs and main. Character * shows the current branch.
Create a branch
A branch is just a name without special characters or spaces. To create a branch we use git branch [name]
~$ git branch test
~$ git branch
* main
testBy default the created branch is not active (it does not have *)
A prefix is often used by convention, when you want to name a branch. for example
-
fix/1233-hair-color: a branch to fix a hair color problem. The ticket number of the bug tracker is often indicated -
feat/add-glasses: a branch to add a feature -
chore/upgrade-jquery: a branch to perform a technical task
Change the current branch
~$ git checkout test
~$ git branch
main
main
* testThe test branch is now the default
You can make a change and save it
~$ echo "Fichier Asciidoc updated" > hello.adoc
~$ git add .
~$ git commit -m "Third commit"You can launch the following commands
~$ git log
~$ git checkout main
~$ git logAs we returned on the main branch we don’t see the last commit (only present in the test branch)
Compare 2 branches
We will reuse the git diff command but we specify the 2 branches separated by …
~$ git diff test...mainThis command should show nothing because test is based on` main` and it is just ahead, it contains all main commits
~$ git diff main...testThis time, as test branch is the reference, Git detects that there are differences
~$ git log
commit 4529128a723e0a16cf405b218f37f2da58c5a9fd (HEAD -> test) (1)
Author: Guillaume EHRET Dev-Mind <guillaume@dev-mind.fr>
Date: Thu Sep 27 00:00:00 2018 +0200
Third commit
commit 9fd87d1ffc654a74105f3f279032e7f88d3d265b (main) (2)
Author: Guillaume EHRET Dev-Mind <guillaume@dev-mind.fr>
Date: Wed Sep 26 23:51:10 2018 +0200
Second commit
...-
Git indicates the HEAD of the test branch
-
Git displays the name of the parent branch =⇒
mainand where it is in the history
You can go back to main and create another branch` test2`
~$ git checkout main
~$ git branch test2
~$ git checkout test2
~$ echo "Fichier toto" > toto.adoc
~$ git add .
~$ git commit -m "Fourth commit"Merge 2 branches
If you want to post your changes from the test branch to` main`, you’re going to do a merge
~$ git checkout main
~$ git merge testDelete a branch
You can delete a branch if this branch is not the active one
~$ git checkout test
~$ git branch -d test
error: Cannot delete branch 'test' checked out at '/home/devmind/Workspace/java/git-demo'
~$ git checkout main
~$ git branch -d test
Deleted branch test (was 9fd87d1).Github
Link your local repository to a remote repository
You can install a centralized Git repository by using Github Enterprise, Gitlab Enterprise, Gogs.But you can also use an online service
-
Create an account under Github
-
Once you are logged in on Github, you can create your first repository
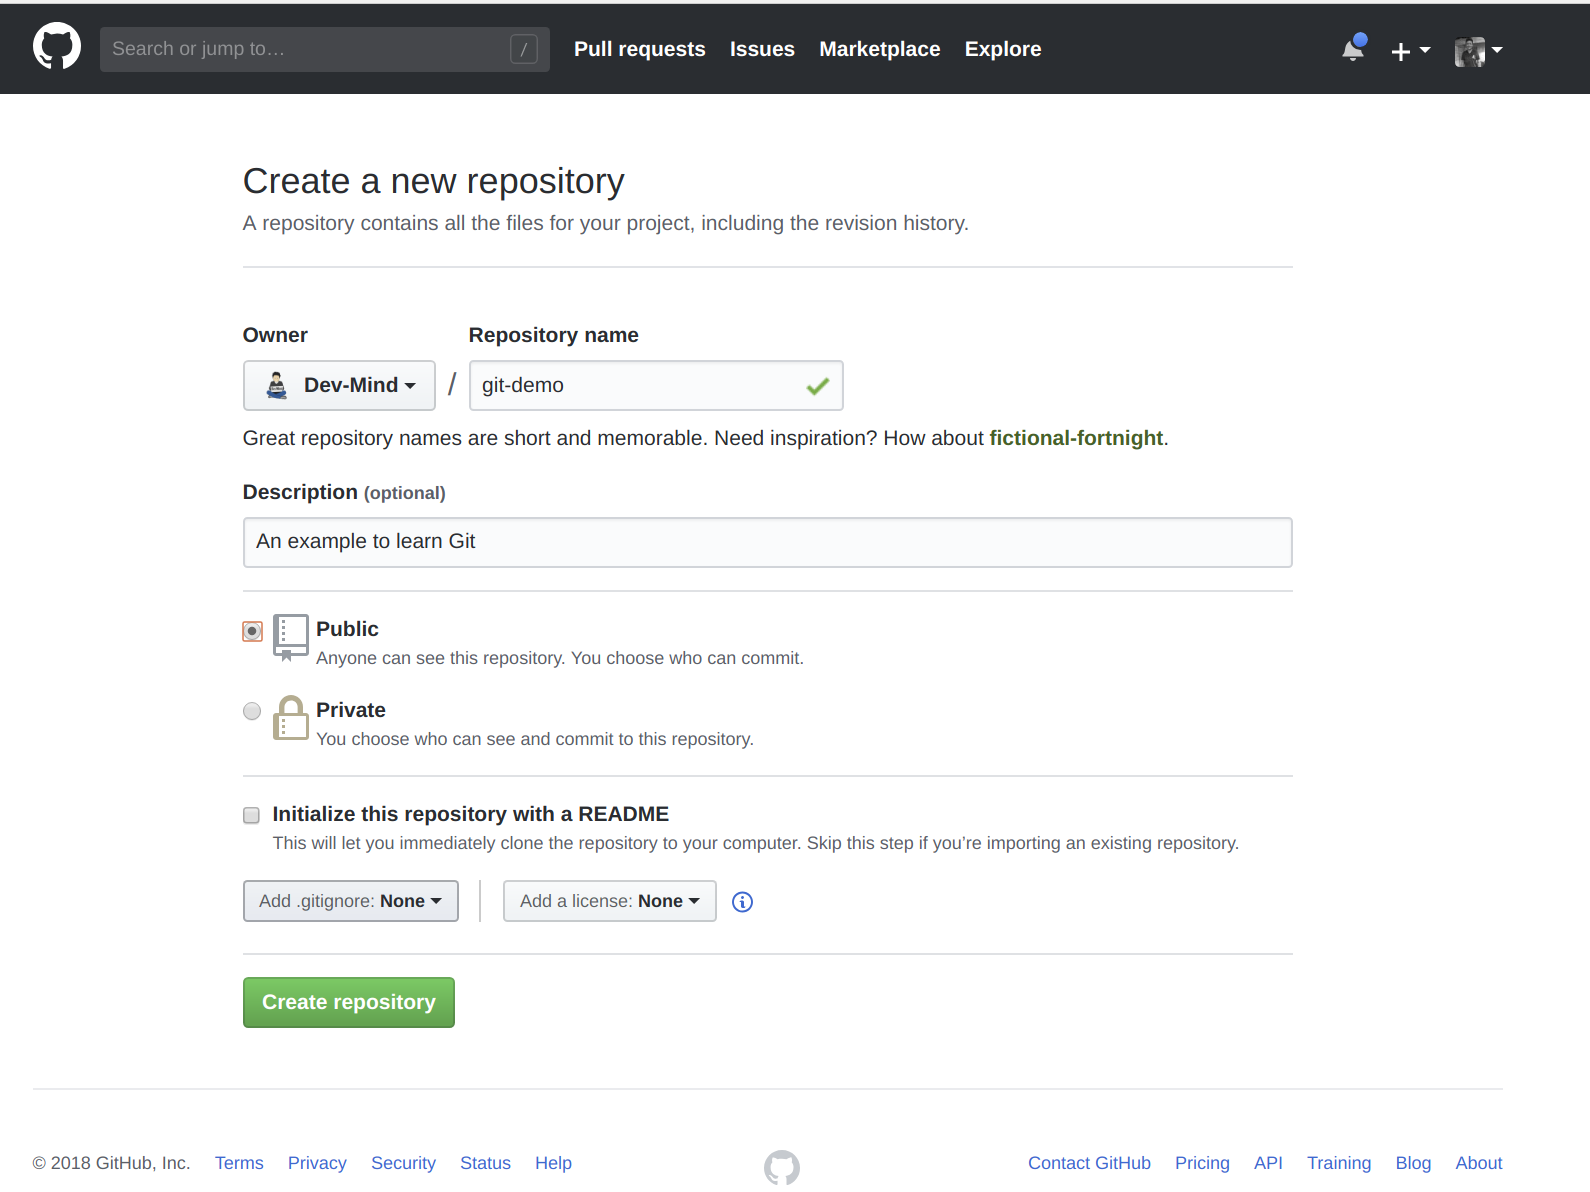
Figure 6. New project under Github
Github provides you commands to connect this remote repository to your local repository.
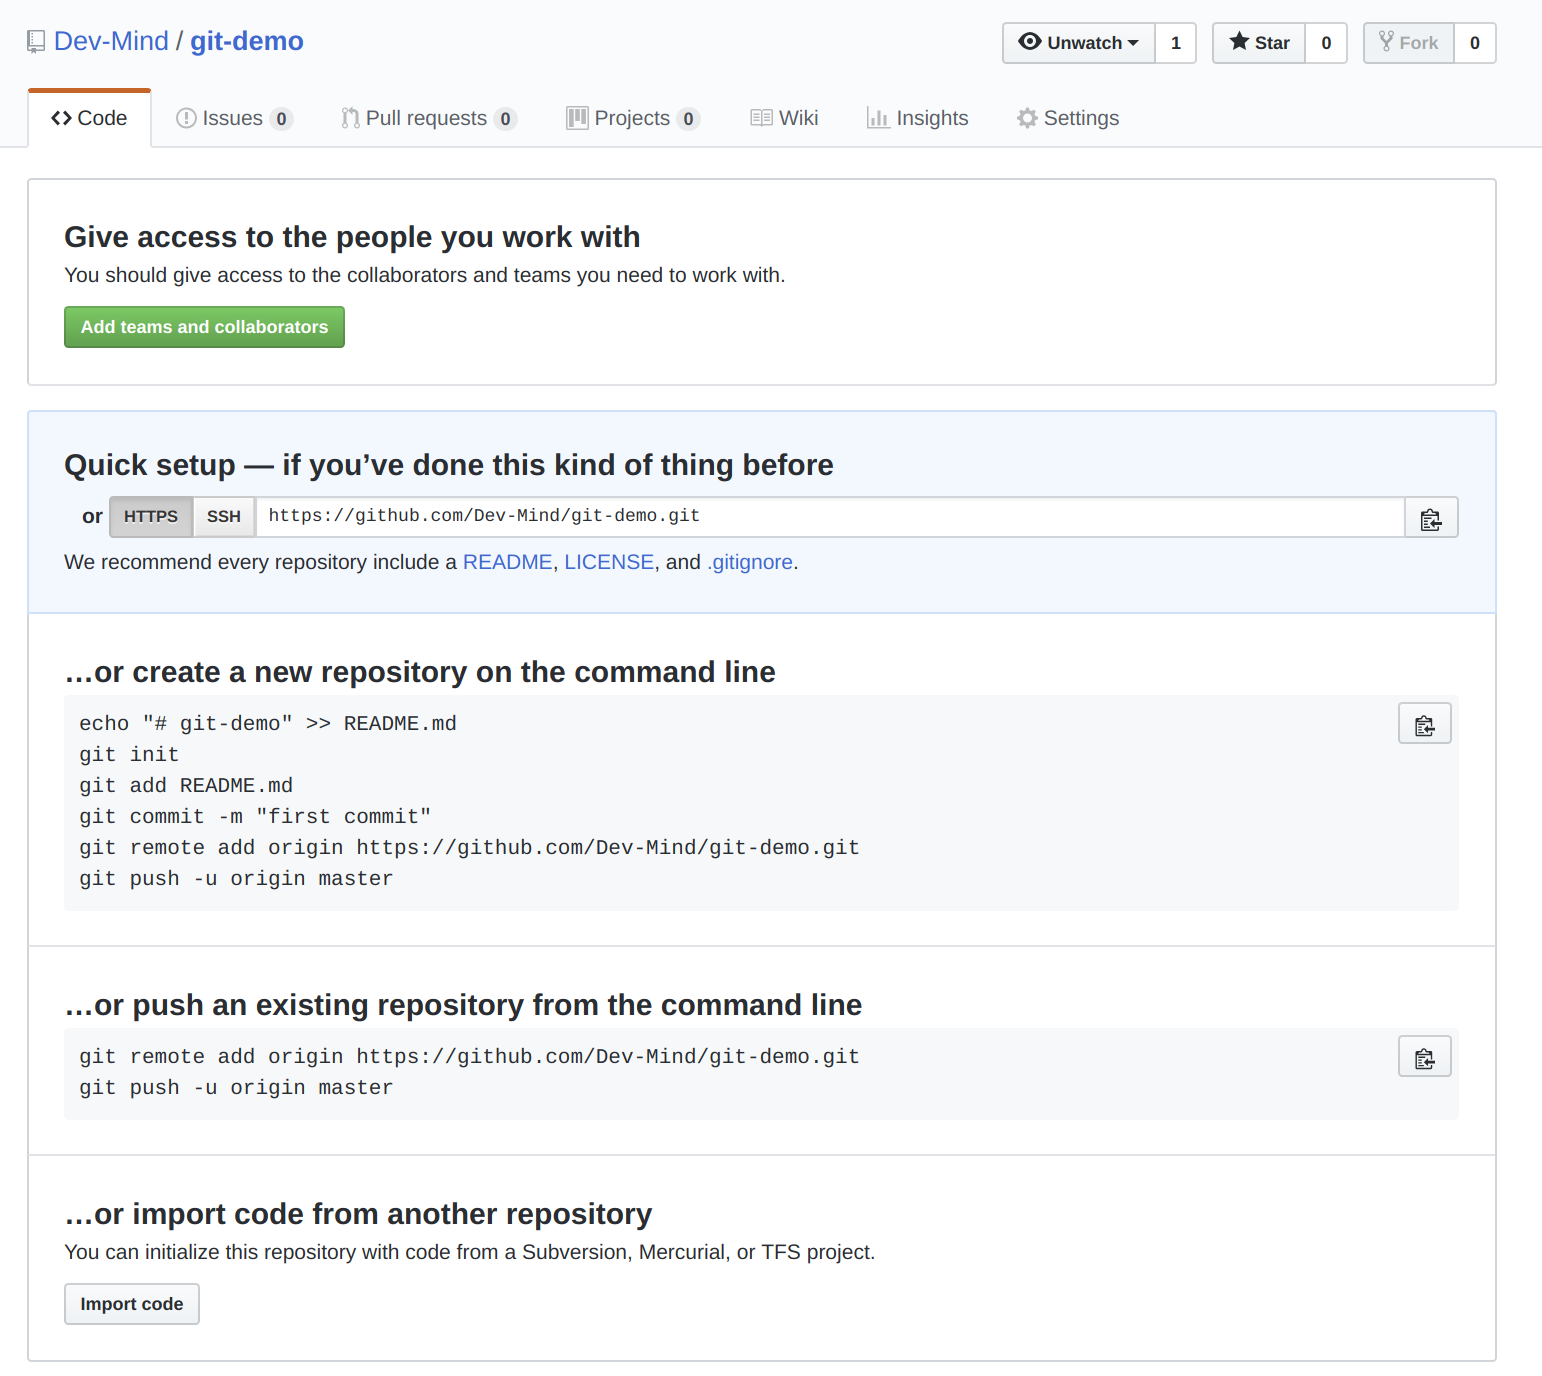
Figure 7. commands to connect this remote repository
To link your local project type the following commands
~$ git checkout main
~$ git remote add origin https://github.com/Dev-Mind/git-demo.git (1)
~$ git push -u origin main (2)-
Git adds remote origin to your local project
-
The push command allows to send what you have on the current branch (local main branch) on the server
If you have a problem to use your login and password in the command line, you can follow this documentation to generate an access token. When you have a token you can use it as password
Github allows teams to synchronize throughout the life of a project. You can push any branch.
~$ git checkout feat/new_hair
~$ git push -u origin feat/new_hairThese commands
-
activate the
feat/new_hairbranch and -
push the changes on Github.
If you want to retrieve local changes made by your colleagues do
~$ git pullThe git fetch command retrieves the history of all branches locally.
Git Project Workflow
When we are working in team, the workflow will be
Create a branch
We usually create a branch from main (or another branch).
Some companies have, for example, a branch dev for the current developments, a branch prod that corresponding to what is in production.
Branches created on these canonical branches must have a short life duration.
Add commits
Every small changes should be made as often as possible.
Each commit, within a branch creates restoration points in the project history.
Open a pull request
When you pushed your changes on Github, you can open a pull request.
This allows to discuss about the current development (for example with the people who will test)
Code Review
In a mature development team, your code is always read by another developers.
Your code is often also tested by other people.
Anyone can make returns on the Pull request.
You can make changes on the branch and pushed other commits to fix the review remarks.
Merge
+When everything is OK you can click the Merge button on the pull request.GitHub automatically performs the equivalent of a local 'git merge' operation.
Deploy
Teams can install your updates or continue development
Conclusion
There’s still a lot of things to say about Git and Github. Some concepts can be complex like rebase or conflict resolution. IDEs will simplify some tasks.You can find more resources on the web http://try.github.io/
This course is there to give you the basics in order to be able to realize the TP using Git. You are now able to save your sources, to share them, to find them easily from one computer to another.
So enjoy with Git