18/08/2024
Android
Table of Contents
In this lesson, you will learn how to create a new View in your app and how to launch it with an Intent
 : Create a new activity
-
In the Project window, right-click the app folder and select New > Compose > Empty Activity. You can also use menu File > New > Compose > Empty Activity. Enter a name for our new activity : RoomActivity. Leave all other properties set to their defaults and click Finish.
-
Android Studio automatically does does things:
-
Creates the RoomActivity file.
-
Adds the required <activity> element in AndroidManifest.xml (each activity must be declared in this file).
-
For the moment the new activity is empty. We will add some widgets to display a room name.
You can also add a new key in the strings.xml file to store the room name
<string name="act_room_name">Room name</string>class RoomActivity : ComponentActivity() {
override fun onCreate(savedInstanceState: Bundle?) {
super.onCreate(savedInstanceState)
enableEdgeToEdge()
setContent {
AutomacorpTheme {
Scaffold(modifier = Modifier.fillMaxSize()) { innerPadding ->
RoomDetail(
name = "Android",
modifier = Modifier.padding(innerPadding)
)
}
}
}
}
}
@Composable
fun RoomDetail(name: String, modifier: Modifier = Modifier) {
Column(modifier = modifier.padding(16.dp)) {
var nameState by remember { mutableStateOf(name) }
Text(
text = stringResource(R.string.act_room_name),
style = MaterialTheme.typography.labelSmall,
modifier = Modifier.padding(bottom = 4.dp)
)
OutlinedTextField(
nameState,
onValueChange = { nameState = it },
placeholder = { Text(stringResource(R.string.act_room_name)) },
)
}
}
@Preview(showBackground = true)
@Composable
fun RoomDetailPreview() {
AutomacorpTheme {
RoomDetail("Android")
}
}Intent : how communicate with this new component ?
An Intent is an object that provides runtime binding between separate components, such as two activities. These activities can be in the same app or not.
For example if you need to open a web page you won’t develop a new browser. You will open this web page in installed browser as Firefox or Chrome.
The Intent represents an app’s intent to do something. You can use intents for a wide variety of tasks, but in this lesson, your intent starts another activity in the same app.
The primary information contained in an Intent is the following:
-
Component name [optional] The name of the component to start. This information makes an intent explicit or not, meaning that the intent should be delivered only to the app component defined by the component name. Without a component name, the intent is implicit and the system decides which component should receive the intent based on the other intent information (such as the action, data, and category—described below).
-
Action A string that specifies the generic action to perform (such as ACTION_VIEW, ACTION_EDIT, ACTION_MAIN, etc.). The action is a string that specifies what the intent should do. For example, ACTION_VIEW might display data to the user, while ACTION_SEND might send data to another app.
-
Data [optional] A URI that references the data to be acted on by the intent (such as a webpage, a contact record, etc.). The data is a URI that references the data to be acted on by the intent. For example, the data can be a webpage, a contact record, or a file.
-
Extras [optional] A Bundle of additional information. This information can be used to provide extended information to the component. For example, if the intent is to send an email, the extras can include the email subject, the email text, etc.
-
…
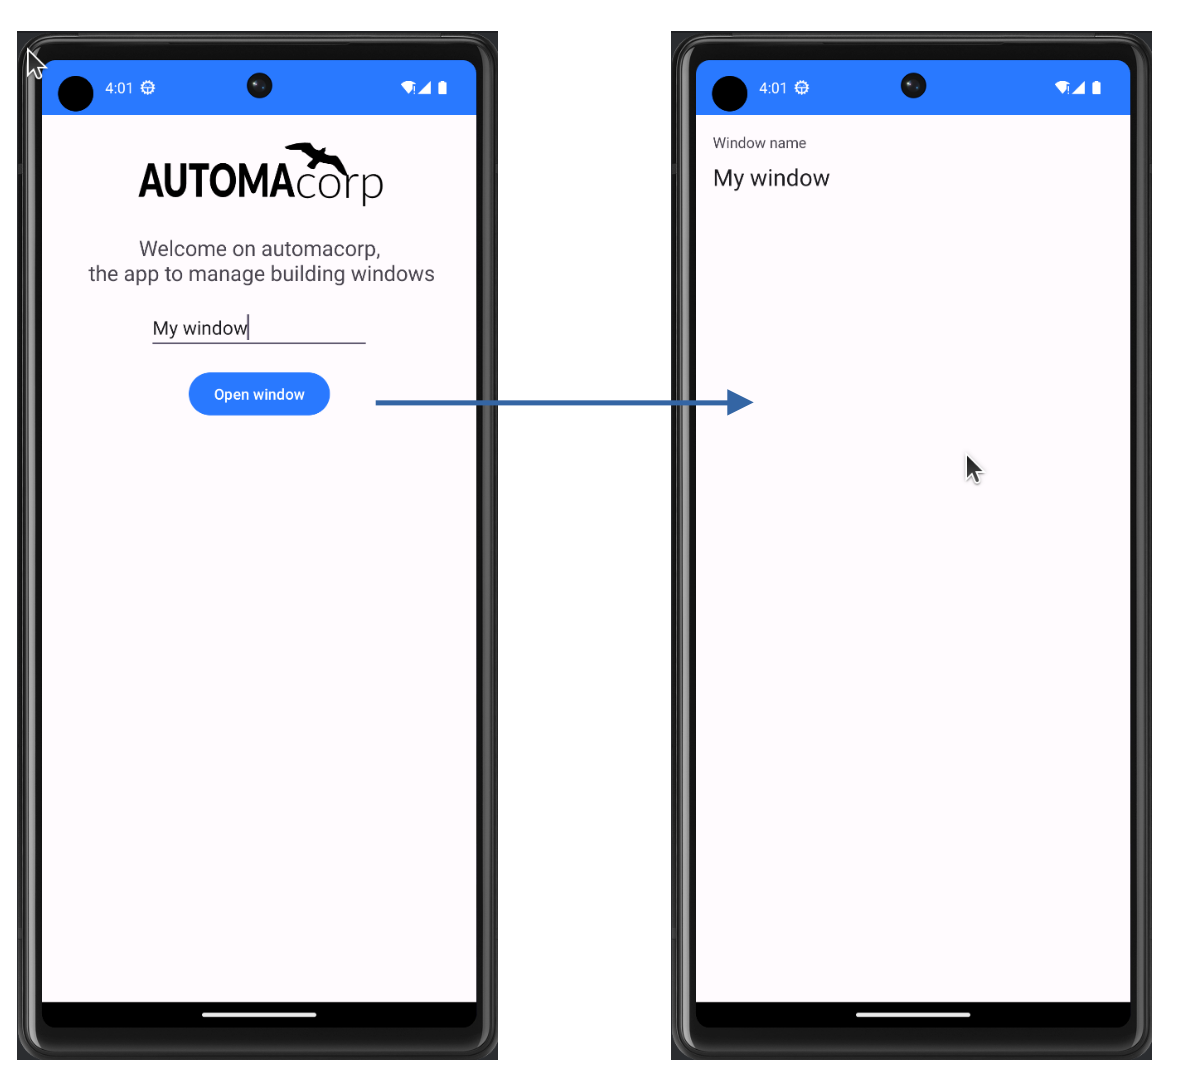
In this lab we will open RoomActivity when a user will click on MainActivity button Open Room name
: Build an intent to open an activity
It’s a good practice to define keys for intent extras with your app’s package name as a prefix. This ensures that the keys are unique, in case your app interacts with other apps. You can define a companion object in the activity class to store these keys as constant.
class MainActivity : ComponentActivity() {
companion object {
const val ROOM_PARAM = "com.automacorp.room.attribute"
}
// ...We will update the onSayHelloButtonClick method to open the RoomActivity with the name filled in the MainActivity (you can remove the Toast message).
For that we will define an Intent, target RoomActivity, and put the room name filled in MainActivity in the sent attributes (extra).
val onSayHelloButtonClick: (name: String) -> Unit = { name ->
val intent = Intent(this, RoomActivity::class.java).apply {
putExtra(ROOM_PARAM, name)
}
startActivity(intent)
}In the RoomActivity class, we will read the name sent in the intent and update the Textview with this name. The job is done in the onCreate method. All parameters sent in the intent are stored in the Bundle object used as argument.
override fun onCreate(savedInstanceState: Bundle?) {
super.onCreate(savedInstanceState)
val param = intent.getStringExtra(MainActivity.ROOM_PARAM)
enableEdgeToEdge()
setContent {
AutomacorpTheme {
Scaffold(modifier = Modifier.fillMaxSize()) { innerPadding ->
RoomDetail(
name = param ?: "",
modifier = Modifier.padding(innerPadding)
)
}
}
}
}It’s time to test yours changes.
Click Apply Changes  in the toolbar to run the app. Type a window name in the text field and click on the button to see the message in the second activity
: Create model to manage room and windows
A room is defined by several properties
-
an id
-
a name
-
a current temperature (this property can be nullable if no data is available) : in the backend app this value is read by a sensor, but here we just need the value of the current temperature
-
a target temperature (this property can be nullable if no data is available)
-
a list of window : for the moment we won’t display these data but we will
A Window is defined by several properties
-
an id
-
a room
-
a status : : in the backend app this value is read by a sensor, but here we just need the value OPENED or CLOSED
We are going to create classes to represent windows and rooms.
-
In the Project window, right-click the package com.automacorp and select New > package.
-
New package will be called model. Select this package, redo a right-click and select New > Kotlin File/Class.
-
Fill a name. For example RoomDto (dto = data transfer object) and create window properties. You can copy this code
data class RoomDto( val id: Long, val name: String, val currentTemperature: Double?, val targetTemperature: Double?, val windows: List<WindowDto>, )Note: when a value is nullable you need to suffix type with ?. In our example currentTemperature can be null, so type is Double? and not Double
-
Redo same steps to create WindowDto
enum class WindowStatus { OPENED, CLOSED} data class WindowDto( val id: Long, val name: String, val roomName: String, val roomId: Long, val windowStatus: WindowStatus ) -
We will now create a service class to manage these windows. We will write 2 methods : one to find all building windows and a second to load only one window by its id. For the moment we will use fake data. In a next lesson we will learn how call a remote service to load real data. This class can be created in the package
com.automacorp.serviceobject RoomService { val ROOM_KIND: List<String> = listOf("Room", "Meeting", "Laboratory", "Office", "Boardroom") val ROOM_NUMBER: List<Char> = ('A'..'Z').toList() val WINDOW_KIND: List<String> = listOf("Sliding", "Bay", "Casement", "Hung", "Fixed") fun generateWindow(id: Long, roomId: Long, roomName: String): WindowDto { return WindowDto( id = id, name = "${ WINDOW_KIND.random()} Window $id", roomName = roomName, roomId = roomId, windowStatus = WindowStatus.values().random() ) } fun generateRoom(id: Long): RoomDto { val roomName = "${ROOM_NUMBER.random()}$id ${ROOM_KIND.random()}" val windows = (1..(1..6).random()).map { generateWindow(it.toLong(), id, roomName) } return RoomDto( id = id, name = roomName, currentTemperature = (15..30).random().toDouble(), targetTemperature = (15..22).random().toDouble(), windows = windows ) } // Create 50 rooms val ROOMS = (1..50).map { generateRoom(it.toLong()) }.toMutableList() fun findAll(): List<RoomDto> { // TODO return all rooms sorted by name } fun findById(id: Long): RoomDto? { // TODO return the room with the given id or null } fun findByName(name: String): RoomDto? { // TODO return the room with the given name or null } fun updateRoom(id: Long, room: RoomDto): RoomDto { // TODO update an existing room with the given values } fun findByNameOrId(nameOrId: String?): RoomDto? { if (nameOrId != null) { return if (nameOrId.isDigitsOnly()) { findById(nameOrId.toLong()) } else { findByName(nameOrId) } } return null } }
For the moment the given class is not complete. You have to implement each method. For example the updateRoom method can be implemented like this
fun updateRoom(id: Long, room: RoomDto): RoomDto? {
val index = ROOMS.indexOfFirst { it.id == id }
val updatedRoom = findById(id)?.copy(
name = room.name,
targetTemperature = room.targetTemperature,
currentTemperature = room.currentTemperature
) ?: throw IllegalArgumentException()
return ROOMS.set(index, updatedRoom)
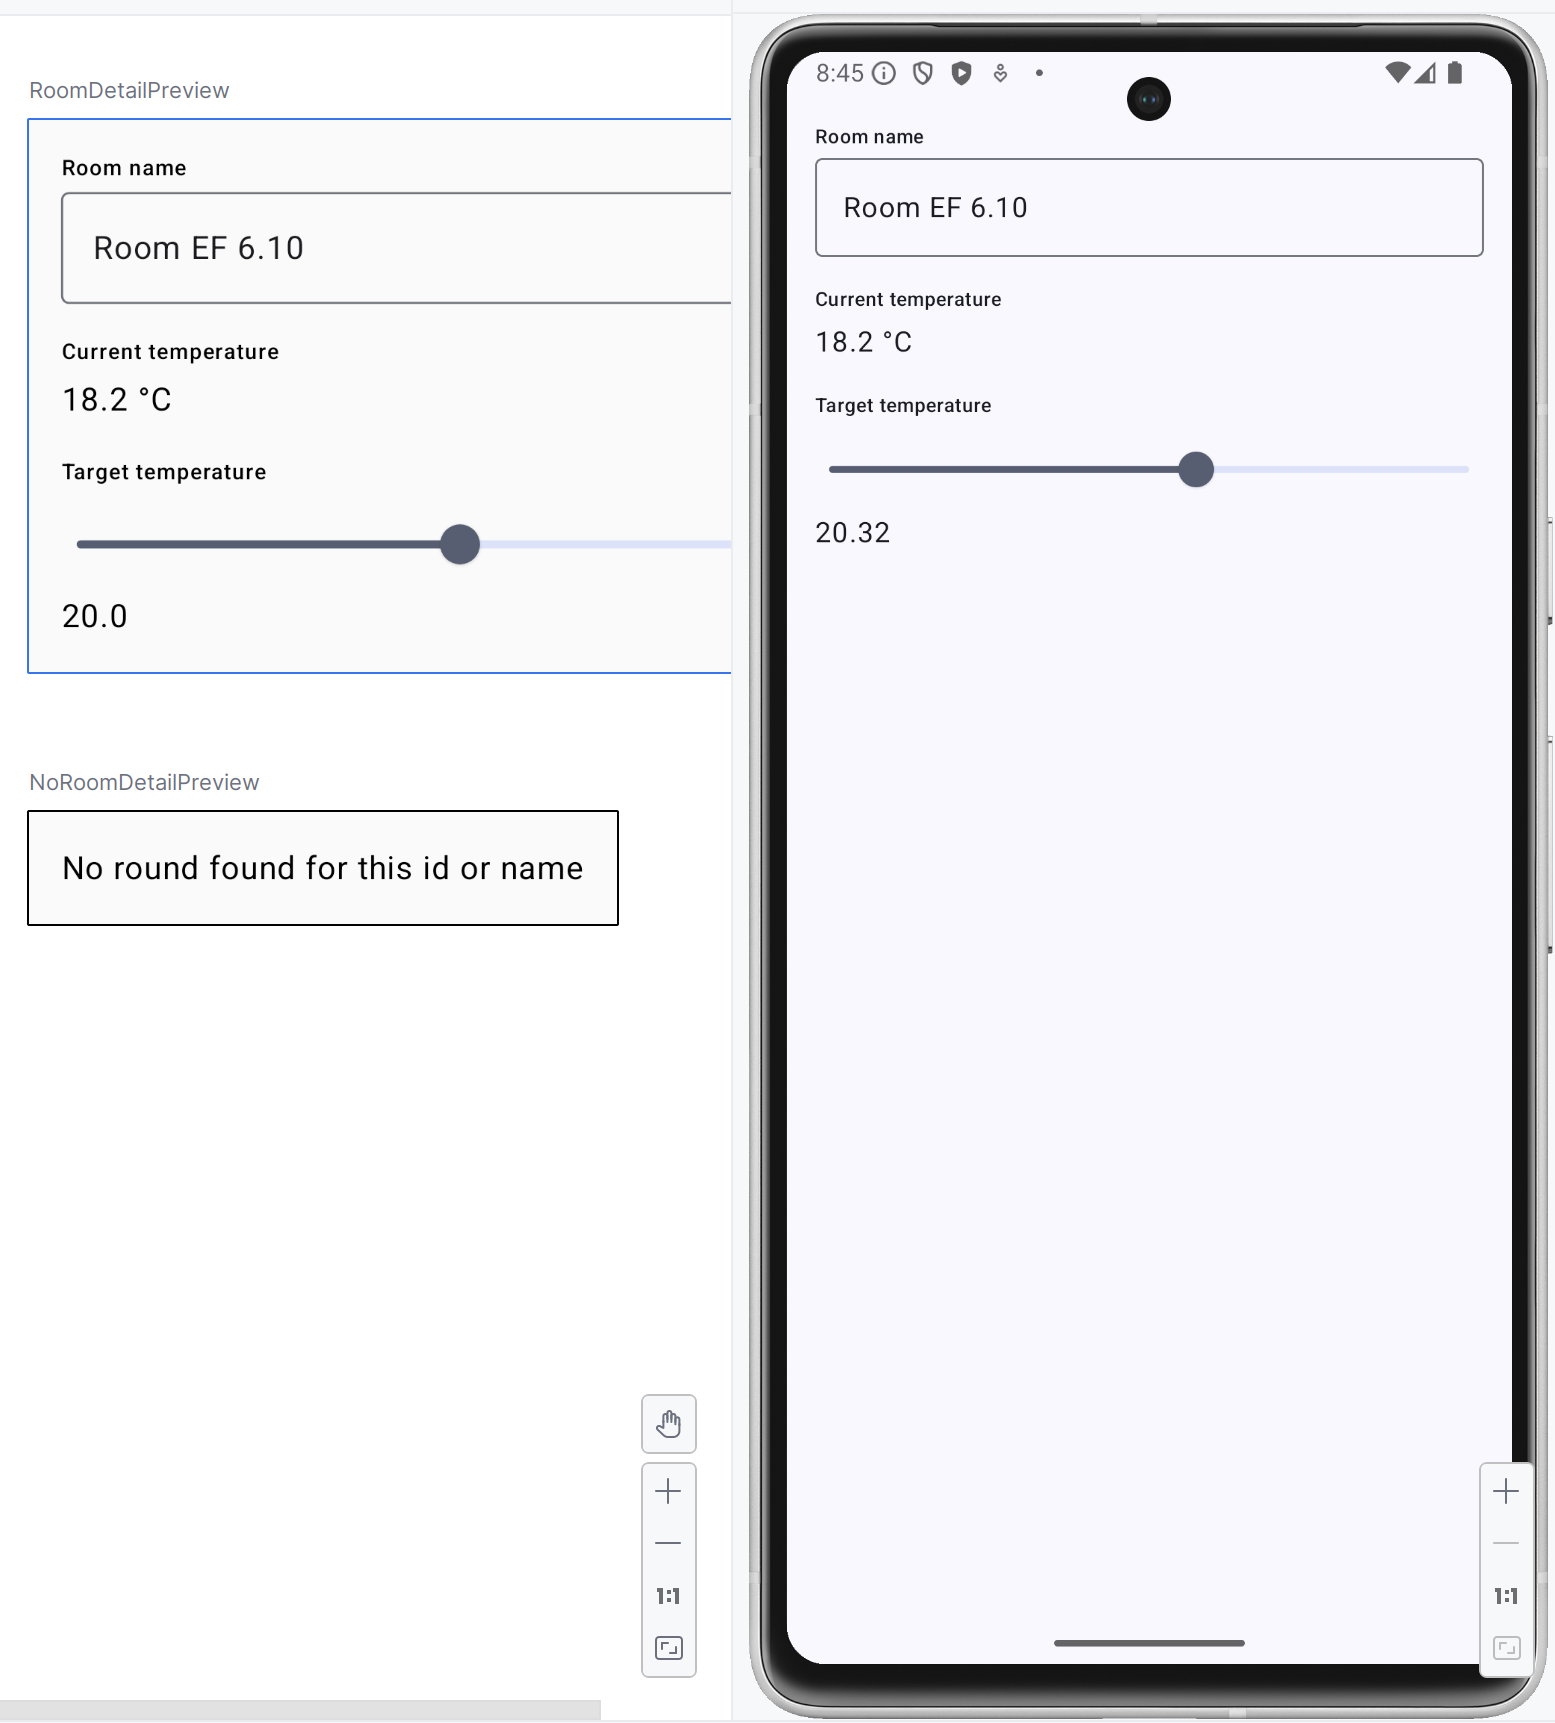
} : Update RoomActivity to display all room properties
We will update the existing RoomActivity to display more data.
You can add a new keys in the strings.xml file to store the room name
<string name="act_room_name">Room name</string>
<string name="act_room_none">No round found for this id or name</string>
<string name="act_room_current_temperature">Current temperature</string>
<string name="act_room_target_temperature">Target temperature</string>We will search for a room that matches the name given in the Intent or if the user fill the room ID we will directly display the corresponding room.
override fun onCreate(savedInstanceState: Bundle?) {
super.onCreate(savedInstanceState)
enableEdgeToEdge()
val param = intent.getStringExtra(MainActivity.ROOM_PARAM)
val room = RoomService.findByNameOrId(param)
setContent {
AutomacorpTheme {
Scaffold(modifier = Modifier.fillMaxSize()) { innerPadding ->
if (room != null) {
RoomDetail(room,Modifier.padding(innerPadding))
} else {
NoRoom(Modifier.padding(innerPadding))
}
}
}
}
}Step 1. Create a new composable called NoRoom to display a message (key act_room_none) when no room is found
Step 2. In the composable RoomDetail, display the room name, the current temperature and the target temperature. As we want to bind the field with the room object, we will use the remember function to store the room object in a mutable state.
var room by remember { mutableStateOf(roomDto) }
Column(modifier = modifier.padding(16.dp)) {
// ...
OutlinedTextField(
room.name,
modifier = Modifier.fillMaxWidth(),
onValueChange = { room = room.copy(name = it) },
placeholder = { Text(stringResource(R.string.act_room_name)) },
)
// ...
}Step 3. Add a Text to display the current temperature. This data is not updatable so we don’t need to use a TextField
Step 4. Add a OutlinedTextField to display the target temperature. This data is updatable so we need to use a TextField. In place of this OutlinedTextField you can use a Slider (more detail on https://developer.android.com/develop/ui/compose/components/slider)
Slider(
value = room.targetTemperature?.toFloat() ?: 18.0f,
onValueChange = { room = room.copy(targetTemperature = it.toDouble()) },
colors = SliderDefaults.colors(
thumbColor = MaterialTheme.colorScheme.secondary,
activeTrackColor = MaterialTheme.colorScheme.secondary,
inactiveTrackColor = MaterialTheme.colorScheme.secondaryContainer,
),
steps = 0,
valueRange = 10f..28f
)
Text(text = (round((room.targetTemperature ?: 18.0) * 10) / 10).toString())This image below show you an implementation example